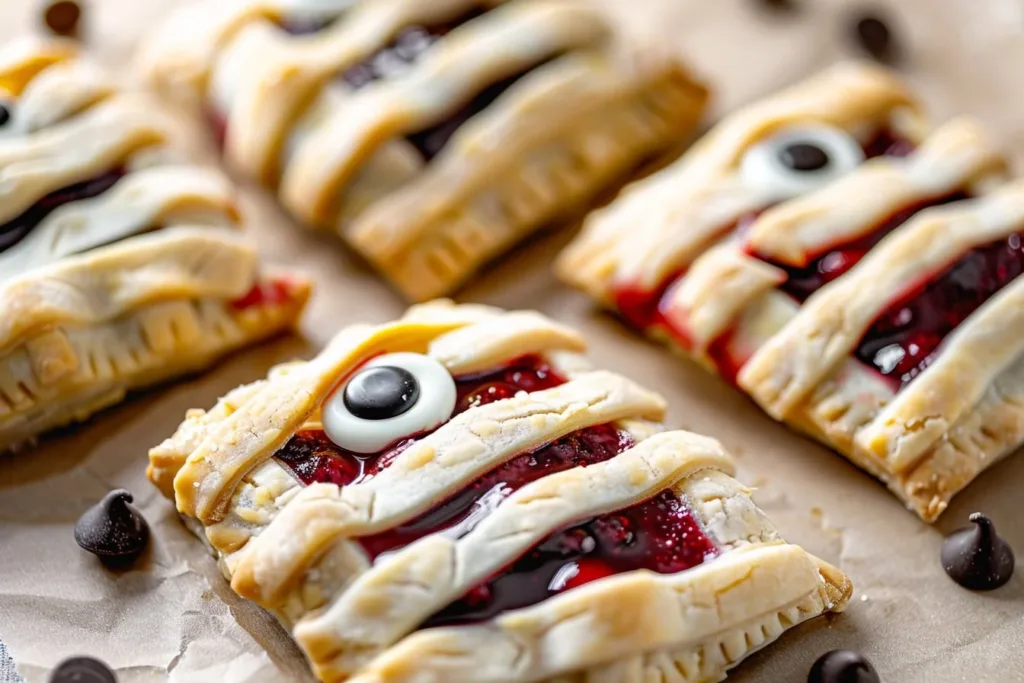
When the leaves start to change and the whispers of Halloween beckon, what could be better than a fun and spooky treat that’s both adorable and delicious? Imagine scrumptious little hand pies, tenderly crafted to look like mummies, with an easy-to-make berry filling that bursts with flavor. Spooky cute mummy hand pies are not only a feast for your taste buds but also a delightful activity to share with family and friends in the heart of fall. So, grab your apron and let’s dive into this delightful recipe that promises to charm everyone at your Halloween gathering!
Ingredients
To create these whimsical mummy hand pies, you’ll need the following ingredients:
For the pie crust:
- 2 cups all-purpose flour
- 1/2 teaspoon salt
- 1 tablespoon sugar
- 1 cup unsalted butter, cold and cubed
- 4–6 tablespoons ice water
For the berry filling:
- 2 cups mixed berries (such as blueberries, raspberries, strawberries)
- 1/4 cup sugar (adjust based on berry sweetness)
- 1 tablespoon lemon juice
- 1 tablespoon cornstarch
For decoration:
- 1 egg (for egg wash)
- 1 cup powdered sugar (for cobweb)
- 2 tablespoons milk (for cobweb)
Optional substitutions:
- For a gluten-free version, use a specialized gluten-free flour blend.
- If you prefer a more robust filling, add a tablespoon of vanilla extract or a pinch of cinnamon to the berry mixture.
Timing
When you’re gearing up to make these adorable hand pies, keep the timing in mind:
- Prep time: 30 minutes
- Cooking time: 20 minutes
- Total time: 50 minutes
By preparing your ingredients in advance, you can slide into pie-making mode and eliminate any hectic moments in the kitchen!
How to Make Spooky Cute Mummy Hand Pies with Easy Berry Filling
Making these spooky cute mummy hand pies is a fun and engaging activity. The steps are simple but provide plenty of opportunities to get creative!
Step 1: Begin by making the pie crust. In a large bowl, mix the flour, salt, and sugar. Then, add the cold, cubed butter. Use a pastry cutter or your fingers to blend the mixture until it resembles coarse crumbs. Slowly add the ice water one tablespoon at a time, mixing until the dough comes together. Once combined, wrap it in plastic wrap and refrigerate for at least 30 minutes.
Step 2: While the dough chills, you can prepare the berry filling. In a medium saucepan, combine the mixed berries, sugar, lemon juice, and cornstarch. Cook over medium heat, stirring gently until the mixture starts bubbling, around 5–7 minutes. Once thickened, remove it from the heat and let it cool.
Step 3: Preheat your oven to 375°F (190°C) and line a baking sheet with parchment paper. Take your chilled dough and divide it into two portions for easy handling. Roll out each portion to about 1/8 inch thick on a floured surface. Cut out rectangles or circles, depending on your preferred pie shape.
Step 4: Lay them on the prepared baking sheet, and place about a tablespoon of the cooled berry filling in the center of half of the cutouts. Be sure to leave enough edge for sealing.
Step 5: Grab the other half of your cutouts, and place them over the filled pieces. Use a fork to seal the edges, crimping them decoratively to keep the filling from spilling out.
Step 6: For that mummy look, use a sharp knife to cut thin strips from the extra dough to create bandage-like shapes. Position these strips over the filled hand pies to give them a spooky charm!
Step 7: Beat the egg and brush it over the tops of the hand pies for a golden finish. Pop them in the preheated oven and bake for about 20 minutes or until they turn a lovely golden brown.
Step 8: While your pies cool, mix the powdered sugar with milk to create a thick glaze for the mummy’s eyes. Drizzle or pipe this glaze over the hand pies to create spooky cobwebs, then use small candies or chocolate chips to make the eyes.
Healthier Alternatives
If you’re looking to make these treats a bit healthier, consider the following modifications:
- Use whole wheat flour for a nuttier flavor and added fiber content.
- Substitute agave syrup or honey for sugar to reduce refined sugar intake.
- Opt for a low-sugar fruit filling by choosing fresh, very ripe berries that need little to no added sugar.
- For a vegan version, replace butter with coconut oil and use a plant-based milk for the glaze.
Serving Suggestions
These charming mummy hand pies are perfect for Halloween parties, but they also shine at any autumn gathering. Serve them warm alongside a scoop of vanilla ice cream or with a dollop of whipped cream for an indulgent treat. Pair these hand pies with a fruity apple cider or a comforting cup of herbal tea; the flavors will complement each other beautifully. To elevate the presentation, arrange the hand pies on a decorative platter with colorful autumn leaves or sprinkle powdered sugar around them for a ghostly touch.
Common Mistakes to Avoid
When whipping up these glorious pie delights, even the best can make a few slip-ups. Here are some common pitfalls to avert:
- Overworking the dough can lead to tough crusts; be gentle and just mix until combined.
- Ensuring the filling isn’t too hot when you add it to the dough is essential; otherwise, it might make the crust soggy.
- Don’t forget to seal the edges completely or the filling may ooze out during baking.
- Make sure the oven is fully preheated, as this will help achieve that nice golden crust.
Storage Tips
To keep your spooky cute mummy hand pies fresh, store any leftover pies in an airtight container in the refrigerator for up to three days. For longer storage, you can freeze them before baking. Just wrap them tightly in plastic wrap and place them in a freezer bag. They should be good for about 2–3 months. When you’re ready to enjoy, no need to thaw: bake from frozen, adjusting the cooking time by a few minutes.
FAQs
Can I use frozen berries for the filling?
Absolutely! Frozen berries work great for the filling. Just cook them a bit longer to ensure they break down and thicken properly.
How do I know when the pie crust is done?
Your hand pies should have a golden-brown color; this indicates they’re cooked through. The filling may also bubble slightly, which is a good sign!
Can I make these ahead of time?
Yes! You can prepare the filling and dough a day in advance and refrigerate them. Shape and bake them fresh when you’re ready to serve!
Can I make mini hand pies?
Certainly! Simply roll your dough thinner and cut out smaller shapes. Adjust the baking time slightly to ensure they cook through.
What other fillings can I use?
Feel free to experiment! Other fruit fillings like apple, cherry, or even pumpkin can add a twist to your hand pies. Just ensure the filling stays sweet and delicious!
Print
Spooky Cute Mummy Hand Pies with Easy Berry Filling
- Total Time: 50 minutes
- Yield: 12 servings 1x
Description
Delightful hand pies designed to look like mummies, filled with a scrumptious berry mixture, perfect for Halloween gatherings.
Ingredients
- 2 cups all-purpose flour
- 1/2 teaspoon salt
- 1 tablespoon sugar
- 1 cup unsalted butter, cold and cubed
- 4–6 tablespoons ice water
- 2 cups mixed berries
- 1/4 cup sugar
- 1 tablespoon lemon juice
- 1 tablespoon cornstarch
- 1 egg (for egg wash)
- 1 cup powdered sugar (for cobweb)
- 2 tablespoons milk (for cobweb)
Instructions
- Begin by making the pie crust. In a large bowl, mix the flour, salt, and sugar. Then, add the cold, cubed butter. Use a pastry cutter or your fingers to blend the mixture until it resembles coarse crumbs. Slowly add the ice water one tablespoon at a time, mixing until the dough comes together. Once combined, wrap it in plastic wrap and refrigerate for at least 30 minutes.
- While the dough chills, you can prepare the berry filling. In a medium saucepan, combine the mixed berries, sugar, lemon juice, and cornstarch. Cook over medium heat, stirring gently until the mixture starts bubbling, around 5–7 minutes. Once thickened, remove it from the heat and let it cool.
- Preheat your oven to 375°F (190°C) and line a baking sheet with parchment paper. Take your chilled dough and divide it into two portions for easy handling. Roll out each portion to about 1/8 inch thick on a floured surface. Cut out rectangles or circles, depending on your preferred pie shape.
- Lay them on the prepared baking sheet, and place about a tablespoon of the cooled berry filling in the center of half of the cutouts. Be sure to leave enough edge for sealing.
- Grab the other half of your cutouts, and place them over the filled pieces. Use a fork to seal the edges, crimping them decoratively to keep the filling from spilling out.
- For that mummy look, use a sharp knife to cut thin strips from the extra dough to create bandage-like shapes. Position these strips over the filled hand pies to give them a spooky charm!
- Beat the egg and brush it over the tops of the hand pies for a golden finish. Pop them in the preheated oven and bake for about 20 minutes or until they turn a lovely golden brown.
- While your pies cool, mix the powdered sugar with milk to create a thick glaze for the mummy’s eyes. Drizzle or pipe this glaze over the hand pies to create spooky cobwebs, then use small candies or chocolate chips to make the eyes.
Notes
These hand pies can be made ahead of time by preparing the filling and dough a day in advance. Bake fresh when ready to serve.
- Prep Time: 30 minutes
- Cook Time: 20 minutes
- Category: Dessert
- Method: Baking
- Cuisine: American
Nutrition
- Serving Size: 1 pie
- Calories: 250
- Sugar: 10g
- Sodium: 200mg
- Fat: 14g
- Saturated Fat: 8g
- Unsaturated Fat: 6g
- Trans Fat: 0g
- Carbohydrates: 30g
- Fiber: 3g
- Protein: 3g
- Cholesterol: 30mg
Conclusion
Spooky cute mummy hand pies with easy berry filling are the perfect blend of whimsy and mouthwatering flavor, sure to impress your guests and become a delightful addition to your Halloween festivities. With simple ingredients and easy steps, these hand pies invite creativity while delivering a satisfying treat. So, gather your loved ones, roll up your sleeves, and indulge in the joy of baking this fall season!